|
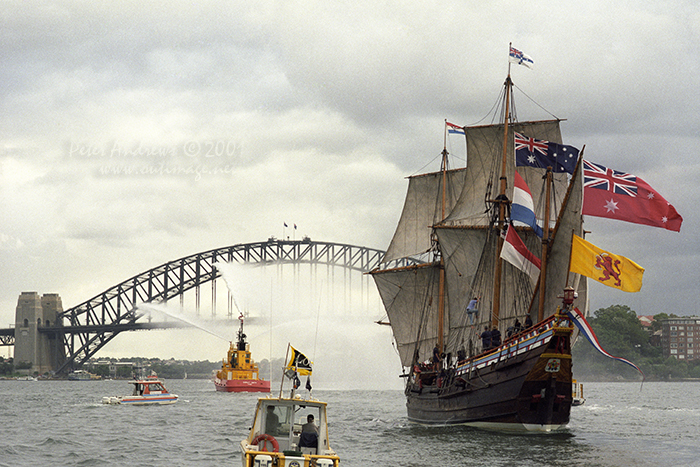
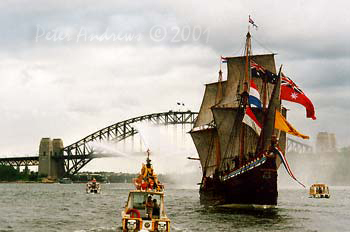
On Wednesday December 23, 2020, the replica of the early 17th century Dutch ship Duyfken sailed again into Darling Harbour in Sydney to her new permanent home at the Australian National Maritime Museum. Prior to this arrival and for many years, Duyfken lived and worked out of the port of Fremantle on the other side of the continent where she was built. Twenty years ago, Duyfken sailed into Sydney Harbour for the very first time after a long voyage from the west coast. The photos including additional unpublished photos of that arrival; as well as those of the other beautiful replica of an early 17th century Dutch ship the Batavia, have been republished here. All the new photos are larger than the original 400 pixel width at 700 pixels and this is the first project for 2021, to celebrate 20 years online of this website.
The original web page published in 2001 can be seen here:
http://outimage.net/pa-work/tallship/vocships/010303voc.htm |
.
|
 |
From the original Article:
On Saturday March 3, 2001, the replica of the early 17th century Dutch ship Duyfken sailed into Sydney to share a berth at the Australian National Maritime Museum with another fine Dutch replica from the same period, the Batavia.
Under the command of Captain Gary Wilson, the sight of this little ship sailing up Sydney harbour to say the least was absolutely magnificent.
Built in Fremantle and launched on January 24, 1999, this little ship has made an epic voyage to the Maluko Province in Indonesia, in order to retrace the voyage which led to the "first recorded European land fall on the Australian continent" (Fitzgerald, 1986:15), of the original Duyfken in 1606.
For anyone with an interest in maritime history, it is indeed a rare treat to have these two outstanding replicas within sigh of each other. However, both ships are destined to leave Sydney before the end of March and it is is quite unlikely that the two will be together ever again in Australia.
Batavia is expected to return to the Netherlands, while Duyfken at this stage is to complete a circumnavigation of Australia by returning to Fremantle.
(Fitzgerald, L. (1986), "Java La Grande: The Portuguese Discovery of Australia", The Publishers, Hobart. ISBN 0 949325 00 7). |
|
|
|
| Links to two pages below with 700 pixel photos of the VOC ships in Darling Harbour, Sydney Australia in 2001. |
|
Duyfken sailing towards the Sydney Harbour Bridge, Saturday March 3, 2001. Click on the photo or the link below for Page 1 with 8 larger photos.
Photo © Peter Andrews / Outimage.
|
 |
|
| VOC ships in Darling Harbour for the first batch of 8 lager photos: Page 1. |
|
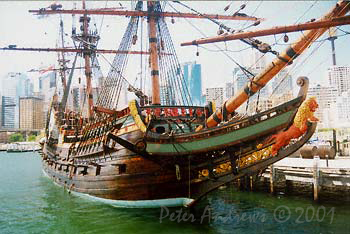
Batavia at the Australian National Maritime Museum, Sydney, Sunday March 4, 2001. Click on the photo or the link below for Page 2 with the final 8 larger photos.
Photo © Peter Andrews / Outimage.
|
 |
|
| VOC ships in Darling Harbour for the second batch of 8 lager photos: Page 2. |
|
| Outimage Publications © 2001-2021. |
|
|
|
| Outimage
Links and Site Info |
|
 |
|
| |
|
|
| |
|
 |
 |
| Outimage Help Page |
Copyright Info |
| |
|
|
|
|
| This
page was checked and found to be a valid
XHTML 1.0 Transitional webpage by the WC3
organisation. |
|
|
|
|
|
|
|
|
|
|